This is a step-by-step guide to creating my NUnit Test Fixture template, available on github.
Objective
95% of the time, when I create a class in Visual Studio, I create a corresponding test class. The class ends up looking something like this:

To get to this from a standard "new class", it's approximately 100 keystrokes. As there's a finite number of keystrokes you can make before you die (see Scott Hanselmans evidence), it's important to cut down the number of keys you press as it will eventually kill you - unless I've deliberately misread the angle of Mr Hanselman's blog post. Anyway, what I needed is a VS template that gives me the above code.
Create The Content
The first step to creating a template is to write the code that you want to end up with - for me, that's the code as shown above. I saved this in a file called NUnitTestFixture.cs.
Define The Template
Next step is to create the mechanism for telling Visual Studio about your template. This is done via an XML definition of your template, saved as a file with a .vstemplate extension. This is the XML definition of the NUnitTestFixture template:
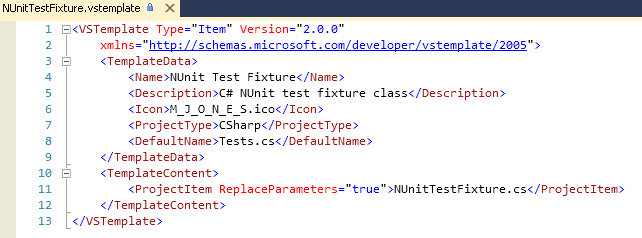
This is what the important parts of this file defines:
- Lines 3 - 9 <TemplateData> defines how the item will appear in the VS "Add new item" dialog.
- Lines 4 - 8 define the individual items of information, displayed in the dialog as shown:

- Lines 10-12 <TemplateContent> define the items that will be added to the VS project when this item is selected.
- Line 11 defines the single item of this template, the code template. I'll show later how to package the template so that these files are available to Visual Studio. The TemplateContent element defines a file that makes up part of the template - in this example there's just one element for the code file NUnitTestFixture.cs. If there was e.g. a help file, a resource file, a designer etc, these would each have a separate TemplateContent element. In the element in the example, the ReplaceParameters attribute indicates that placeholders in the file can be replaced with variables.
Replace Parameters
When a NUnitTestFixture class is required in a project, there will be details that are only known when the item is created, for example the default namespace of the project, and the name of the class as input by the user:

Templates are able to be parameterised so that at the time of creation, placeholders can be replaced with their correct values. There are several built-in parameters available to use, see the MSDN documentation for a full list.
For the variables shown above, the built in parameters that are needed are rootnamespace and itemname; rootnamespace is the default namespace for the project the item is being added to, and itemname is the name of the file as input by the user on the "Add new item" dialog. The convention for defining placeholders is to wrap the parameter name in $ characters, so NUnitTestFixture.cs needs to look like this

Package The Template
For Visual Studio to make the template available, it needs to have all the files supplied in the form of a ZIP archive. For the example here, the files to include are
- the code file, NUnitTestFixture.cs
- the 48x48 pixel icon file, M_J_O_N_E_S.ico
- the template definition file, NUnitTestFixture.vstemplate
Tip: to find out where your Item Tempate folder is, go to Tools -> Options -> Projects and Solutions -> General.
Further possibilities
I've barely scratched the surface with this template and there is far more configuration available than this blog post shows. There's a heap more to read about this topic on MSDN.
No comments:
Post a Comment